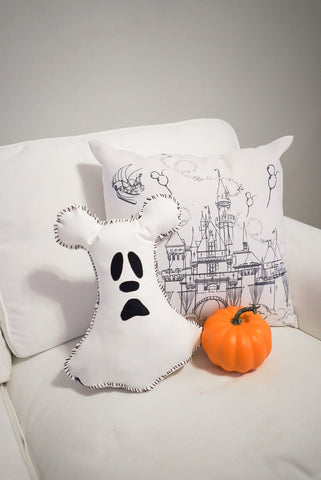
How to make a Mickey Ghost Pillow at Home
It's Halloween, and what better way to celebrate than with decorating your home for the holidays, the Halloween Holidays!
We wanted to make things extra spooky here so we decided to DIY a little Spooky and Disney with the Mickey Ghost Pillow, and we can show you how to make one at home too!
What you will need:
-
1/2 Yard White Cotton Twill Fabric
-
1/4 Yard (or smallest size possible) Black Cotton Twill Fabric
-
Fabric or School Glue
-
Large Yarn Needle
-
Black Cotton Thread
-
Pillow Stuffing
-
Cardboard, Scissors & Pen to make the stencil


All of these materials cost me around $11 from a craft store but we have linked a few of the items below you can order from online
Firstly, here is our FREE stencil for your to download and print at home, we would recommend printing on a 11x17 piece of paper, or use regular sized paper and print to halves of the pillow and stick together.

STEP ONE:
-
Once you have the Mickey Ghost Stencil cut out, use some cardboard to cut out another stencil to use for the material
-
With the Cardboard stencil, draw around on the White Twill Material and cut out TWO ghost shapes


STEP TWO:
-
Cut another piece of the White Twill cotton material in a long strip, this will be the base of your pillow, it need to be the length of your ghost pillows
-
Once you have the rectangle piece of White Twill, lay the ghost pillow pieces onto of the rectangle
-
Get your needle and thread and start to sew one part of the rentable to the edge of the bottom of the ghost pillow, so rectangle shape may be a little interesting to fit the bottom but it will allow for more stuffing in the pillow


STEP THREE:
-
Sew the edge all along the rectangle, the stitch should be an over stitch, the black stitch will attach both pieces of fabric but the black stitching is apart of the design
-
Do the same for the other piece of the Ghost Pillow piece of material so the rectangle is in the middle as seen in the image below


STEP FOUR:
-
At each of the corners where the stitch lies, pinch together and lay the other on top of each other and continue the stitch up the edge of the ghost stencil, make sure to stitch both of the pieces together


STEP FIVE:
-
Continue to stitch the pieces around the ghost pillow, make sure to leave a gap at the top in between the ears of the pillow to allow for stuffing


STEP SIX:
-
Use the stencil eyes to cut out the eyes and nose and mouth, we used Black Cotton twill, you can also use any black fabric for these pieces, cut out:
2 x eye pieces
1 x nose
1 x mouth
-
Position the pieces of fabric onto the pillow in the position you would like, we use School glue, you can use any fabric glue to stick the material onto the pillow


STEP SEVEN:
-
Keeping the gap at the top of the pieces of fabric, add the polypill or pillow filler into the pillow as much as you'd like to stuff the pillow with making sure the stuffing goes into the ears and each corners of the pillow


STEP EIGHT:
-
Once you have the desired fill, sew up the hole with the black thread stitch again and then you should have the finished ghost pillow


Here are our finished pillow once completed, tag us on instagram @grapesodaco if you give this tutorial a try and we can't wait to see your pillows!